Java 源码学习之java.util.LinkedHashMap
LinkedHashMap是基于HashMap实现的,但是与之不同的是LinkedHashMap在遍历取值时可以保序,这是通过双向链表来实现的。
我们知道HashMap在增删改查方面非常高效,但是遗憾的时候在迭代遍历HashMap时是不保序的,常常我们有时候即需要这种高效的操作,同时还希望在遍历数据集时要保序的需求,所以这个时候LinkedHashMap就出来了,接下来文本讲解LinkedHashMap是如何基于HashMap来完成遍历保序的功能。
LinkedHashMap的定义
1 | public class LinkedHashMap<K,V> |
从LinkedHashMap的定义中可以很清晰的看到它就是基于HashMap来进行实现的,但是这里不理解的是为何它还要继承Map接口?因为HashMap已经继承了Map接口了,LinkedHashMap这样干是不是没必要,后来我也查了资料,也没有明确得答案,也有人说LinkedHashMap这样继承没有为什么,你懂就好了。-_-
私有变量
1 | /** |
上面源码中是LinkedHashMpa的两个比较重要的私有变量:
- header:该变量是双向链表的头部,
LinkedHashMap是通过维护这个双向链表来实现保序的,该变量是一个Entry类型,在下文是详细讲解。 - accessOrder:当accessOrder为true时遍历使用访问顺序(基于此可以实现LRU缓存),当accessOrder为false时使用插入顺序(默认)。
构造函数
1 | /** |
从LinkedHashMap的构造函数中可以了解到:
- 一般都是直接调用了父类
HashMap的构造函数 - 绝大部份构造函数中将accessOrder默认为false,只有在最后一个构造函数中可以显示得将accessOrder置为你所需要的属性。
注意,在初始化父类HashMap的构造函数的时会调用一个init()的方法,在LinkedHashMap重写了该方法:1
2
3
4
5
6
7
8
9
10/**
* Called by superclass constructors and pseudoconstructors (clone,
* readObject) before any entries are inserted into the map. Initializes
* the chain.
*/
@Override
void init() {
header = new Entry<>(-1, null, null, null);
header.before = header.after = header;
}
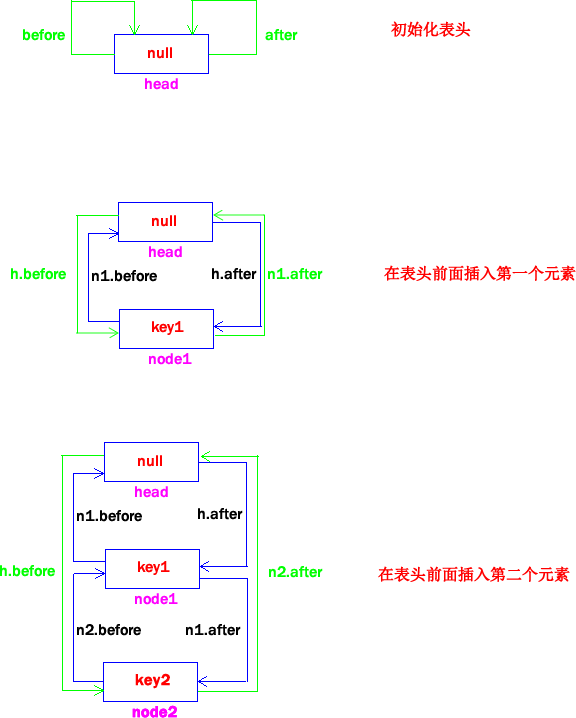
可以发现该方法额外初始化了双向链表的表头:
containsValue
为什么要讲这个不起眼的方法呢?因为在LinkedHashMap中利用自己双向链表来优化这个是否包含值的方法。HashMap:1
2
3
4
5
6
7
8
9
10
11
12
13
14
15
16
17
18
19/**
* Returns <tt>true</tt> if this map maps one or more keys to the
* specified value.
*
* @param value value whose presence in this map is to be tested
* @return <tt>true</tt> if this map maps one or more keys to the
* specified value
*/
public boolean containsValue(Object value) {
if (value == null)
return containsNullValue();
Entry[] tab = table;
for (int i = 0; i < tab.length ; i++)
for (Entry e = tab[i] ; e != null ; e = e.next)
if (value.equals(e.value))
return true;
return false;
}
LinkedHashMap:
1 | /** |
从两者的源码中更可以看出,虽然两者最坏都是需要进行table.size次的equals比较,但是在HashMap中会遍历整个table,我们知道有loadFactor的存在,所以table中还是比较稀疏的,那这样的话HashMap会进行很多无谓的遍历,而在LinkedHashMap中里面是都是紧凑的,使用这种方法来遍历要比HashMap的性能提升了不少。
LinkedHashMap.Entry
该Entry从HashMap继承而来,也正是因为有它才可以完整的实现双向链表。1
2
3
4
5
6
7
8
9
10
11
12
13
14
15
16
17
18
19
20
21
22
23
24
25
26
27
28
29
30
31
32
33
34
35
36
37
38
39
40
41
42
43
44
45
46
47
48/**
* LinkedHashMap entry.
*/
private static class Entry<K,V> extends HashMap.Entry<K,V> {
// These fields comprise the doubly linked list used for iteration.
Entry<K,V> before, after;
Entry(int hash, K key, V value, HashMap.Entry<K,V> next) {
super(hash, key, value, next);
}
/**
* Removes this entry from the linked list.
*/
private void remove() {//it will be invoked while user use the remove(Obj) method
before.after = after;
after.before = before;
}
/**
* Inserts this entry before the specified existing entry in the list.
*/
private void addBefore(Entry<K,V> existingEntry) {//if the existngEntry is head
after = existingEntry;
before = existingEntry.before;
before.after = this;
after.before = this;//insert the this node to the first head
}
/**
* This method is invoked by the superclass whenever the value
* of a pre-existing entry is read by Map.get or modified by Map.set.
* If the enclosing Map is access-ordered, it moves the entry
* to the end of the list; otherwise, it does nothing.
*/
void recordAccess(HashMap<K,V> m) {
LinkedHashMap<K,V> lm = (LinkedHashMap<K,V>)m;
if (lm.accessOrder) {
lm.modCount++;
remove();
addBefore(lm.header);
}
}
void recordRemoval(HashMap<K,V> m) {
remove();
}
}
- 从
Entry中可以看到,它自己定义了两个变量before,after,分别是指向双向链表的两端。 addBefore是实现链表的核心,它是在createEntry的重写方法中被调用,传的existingEntry参数总是header其实该链表是一个收尾相连的链表,每次添加的新元素都是连接到header的前面:如下图(其中绿色的线表示下一次插入时会修改该指向)

recordAccess方法就是实现LinkedHashMap有以访问顺序遍历的功能,每次使用put和get都是调用它,当开启accessOrder时,首先会讲当前元素移除,但是会讲它再次插入到header的后面。- 在说一下关于双向链表的删除,我们知道平常都是调用
HashMap.remove(obj)来进行键值对的删除的,看过我之前写的HashMap的小伙伴都知道其实是调用了removeEntryForKey方法才进行真正的查找删除,该删除时又会调用recordRemoval方法,该方法在HashMap.Entry中是一个没有任何实现的方法,在LinkedHashMap.Entry中进行重写,直接调用remove方法进行链表节点的删除。
LinkedHashIterator
不用多说,经历了上面层层的重写之后,LinkedHashMap最终是靠这个迭代器来实现保序遍历的。1
2
3
4
5
6
7
8
9
10
11
12
13
14
15
16
17
18
19
20
21
22
23
24
25
26
27
28
29
30
31
32
33
34
35
36
37private abstract class LinkedHashIterator<T> implements Iterator<T> {
Entry<K,V> nextEntry = header.after;
Entry<K,V> lastReturned = null;
/**
* The modCount value that the iterator believes that the backing
* List should have. If this expectation is violated, the iterator
* has detected concurrent modification.
*/
int expectedModCount = modCount;
public boolean hasNext() {
return nextEntry != header;
}
public void remove() {
if (lastReturned == null)
throw new IllegalStateException();
if (modCount != expectedModCount)
throw new ConcurrentModificationException();
LinkedHashMap.this.remove(lastReturned.key);
lastReturned = null;
expectedModCount = modCount;
}
Entry<K,V> nextEntry() {
if (modCount != expectedModCount)
throw new ConcurrentModificationException();
if (nextEntry == header)
throw new NoSuchElementException();
Entry<K,V> e = lastReturned = nextEntry;
nextEntry = e.after;
return e;
}
}
有了上面维护的双向链表之后,保序的迭代器也变得异常简单了,从上面的源码中可以很清晰的看到该迭代器每次都是使用e.after作为next的值,而这个双向链表是有序的(默认是插入序,也可以设置成访问序),所以在遍历LinkedHashMap时可以保序取值。
实现LRUCache
LRUCache是一种常用的缓存策略,该策略的原理就是当缓存容量满时删除掉最少使用的缓存,这个算法可以使用LinkedHashMap来很方便的实现。1
2
3
4
5
6
7
8
9
10
11
12
13
14
15
16
17
18
19
20
21
22
23
24
25/**
* 实现基于LinkedHashMap的LRUCache
* @author yyl
*
* @param <K>
* @param <V>
*/
static class LRUCache<K,V> extends LinkedHashMap<K,V>
{
private int maxCacheNum=10;
public LRUCache(int length)
{
super(10,0.75f,true);//这里第三个参数一定要为true,这样就表示该LinkedHashMap是使用了访问速度来链表
this.maxCacheNum=length;
}
/**
* 重写删除最少用元素的方法
*/
@Override
protected boolean removeEldestEntry(Map.Entry<K,V> eldest) {
return this.size()>maxCacheNum;
}
}
这里只需要重写removeEldestEntry这个方法即可,该方法在添加元素的时候会被调用,如果当前链表中的元素个数大于设定的最大个数,则删除最少使用的元素。注意 这个缓存在构造LinkedHashMap的时候一定要将accessOrder设置为true,这样LinkedHashMap的双向链表就会维护一个访问顺序的链表。
参考
本作品采用[知识共享署名-非商业性使用-相同方式共享 2.5]中国大陆许可协议进行许可,我的博客欢迎复制共享,但在同时,希望保留我的署名权kubiCode,并且,不得用于商业用途。如您有任何疑问或者授权方面的协商,请给我留言。

